I have been learning Rust on and off for a while now. I usually build small projects to get comfortable with the syntax and the compiler. Those are great for learning, and there is no shortage of tutorials out there, but I hit a wall. Following one guide after another only taught me the syntax.
I felt stuck. I wanted something that would actually challenge my thinking, not just make me good at following video instructions only to draw a blank when starting from scratch. I wanted to build something I could call my own.
While stewing on that, I stumbled across computer vision (CV). I did what I always do: fell down a rabbit hole and read everything I could find.
It felt like discovering a hidden world. I found a deep technical niche where people dedicate their entire careers. The real-time vision systems, in particular, caught my attention.
The only catch is that almost everyone does computer vision in Python and C++. Honestly, I am in awe of the C++ codebase and the massive amount of work the contributors have poured into the OpenCV project on GitHub.
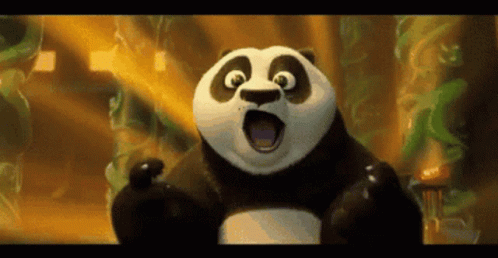 Me looking at high-quality C++ code. I wish to write that quality of Rust code.
But I want to learn Rust and do computer vision in it. This lets me hit two birds with one stone. First, I force myself to learn the hard way. Second, I get to fully embrace the trope of the Rust developer who wants to rewrite everything in Rust. (I never quite understood the hate for that trope, by the way. We watched applications go from Bash to Python to C++, so the "Rewrite in Rust" backlash feels a bit exaggerated.)
Choosing a Computer Vision Library in Rust
I started searching for CV projects already written in Rust. I needed a reference point to start from, and I needed to reassure myself that I wasn't crazy for attempting this.
I found a few GitHub projects, including this YOLO (You Only Look Once) implementation in Rust. It even had a highly readable example.
This proved it was possible. Next, I had to find the right library. The ecosystem is basically split into two camps: native libraries (written entirely in Rust) and bindings (wrappers around a system written in another language, like C++).
Let's look at the purely native Rust libraries:
- kornia-rs: A low-level 2D and 3D computer vision library written entirely in native Rust. It features a statically-typed tensor system, safe memory management using Rust's ownership model, and supports image I/O, transformations, and visual language model integration.
- rust-cv (cv core): An ecosystem of small, pure Rust crates designed to provide core computer vision types and algorithms. It handles camera models, poses, and multi-consensus algorithms, all built to work without external C dependencies.
- iris-cv: A fast, deep-learning-first CV library in pure Rust. It uses the Burn framework to run tensor computations on the CPU or GPU (via WGPU, CUDA, or Metal). It features a modern API for image filtering, contour tracking, and out-of-the-box ONNX model hosting.
And libraries that act as bindings:
- opencv-rust: Rust bindings for the massively popular C++ OpenCV library. While it gives you access to industry-standard, battle-tested algorithms for everything from real-time processing to object detection, it strictly requires installing the underlying C++ library as a system dependency.
Hardware Acceleration: CPU vs. GPU
I evaluated these libraries with real-time applications in mind. For a program to achieve low latency, it has to process operations in fractions of a second. Relying on the GPU is usually mandatory for that level of performance.
I looked into iris-cv, but the purely native kornia-rs library felt much closer to what I want to do right now. It is also backed by excellent documentation.
We will tackle real-time GPU usage later. First, I want to pick one library, learn the fundamentals, and write a program to handle standard CV operations. We have to start with static image manipulation before we try feeding live video from a camera.
(Quick note: This article was drafted late at night and edited early in the morning, so my thought process might be a little chaotic!)
Tutorial: Converting an RGB Image to Grayscale in Rust
This first program will take a standard color PNG image and convert it into grayscale using kornia-rs.
Let's set up the project:
cargo new vision-rs
cd vision-rs
Next, add kornia-rs and image as dependencies:
cargo add kornia-rs image
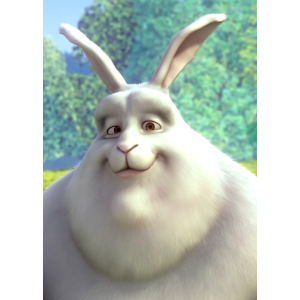
Here is the input image I will be using for this experiment:
I use Helix Editor for coding because it just feels right. Let's open the main file:
hx src/main.rs
use image::GrayImage;
use kornia_rs::color;
use kornia_rs::image::Image;
use kornia_rs::io::functional as F;

fn main() -> Result<(), Box<dyn std::error::Error>> {
    let rgb_u8: Image<u8, 3> = F::read_image_any("input.png".as_ref())?;

    let rgb_f32: Image<f32, 3> = rgb_u8.cast()?;

    let gray_f32: Image<f32, 1> = color::gray_from_rgb(&rgb_f32)?;

    let raw: Vec<u8> = gray_f32
        .data
        .iter()
        .map(|&v| v.round().clamp(0.0, 255.0) as u8)
        .collect();

    let img = GrayImage::from_raw(
        gray_f32.width() as u32,
        gray_f32.height() as u32,
        raw,
    )
    .expect("failed to create GrayImage");

    img.save("output_gray.jpg")?;

    Ok(())
}
Let's break down what the code is actually doing.
Right at the top, we pull in our imports. We need GrayImage from the standard image crate to handle saving the final file, and a few modules from kornia_rs to handle the file reading and the math.
Inside main, the first step is reading input.png into memory. The type Image<u8, 3> tells Rust exactly what to expect: an image made of standard 8-bit integers (u8) with 3 color channels (Red, Green, Blue).
Next, we cast that image into f32 (floating-point numbers). In computer vision, mathematical operations are much more accurate when you use floats instead of whole integers, so doing this early prevents messy rounding errors.
Then we hit the actual conversion: color::gray_from_rgb(&rgb_f32)?. This single line condenses our 3-channel color float image down to a 1-channel grayscale float image.
Once we have the grayscale data, we need to prepare it for saving. We iterate through the raw float data, round the numbers, clamp them between 0.0 and 255.0 (the standard color range), and map them back to a standard u8 array.
Finally, we use GrayImage::from_raw to rebuild the image using our new byte array, passing in the original width and height so the pixels map correctly. If it succeeds, we save it as output_gray.jpg.
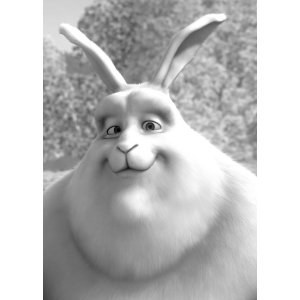
And this is the final output result:
What's Next?
And that wraps up my first program doing basic computer vision in Rust! I will be publishing more content as I dive deeper into this ecosystem, so you can find all my related posts under the Computer Vision tag.
This article has been shared across a few Rust communities. If you have questions, feedback, or want to share your own experience with computer vision in Rust, feel free to jump into the conversation:
Let me know your thoughts on this. If you are building anything cool in Rust or exploring a new technical niche, I would love to hear about what you are working on.